Pagodas Project Part Six: Reproducing the Missing Ornaments

Back in the first project blog where we introduced the pagodas in March 2022, we described and showed the varied assortment of ornaments that came with the pagodas. The blogs since then have focused on the restoration work on the main tiers of the pagodas. With the main tiers restoration complete in Pagodas Project Part Five, Gilding and Toning, this blog describes the narrative behind the restoration of the applied ornaments, which happened alongside this work.
Research into the ornaments
When looking and discussing other examples of near identical pagodas at the V&A, Bibliothèque nationale de France (BnF) and the Sevres National Museum, it became clear that the original pagoda ornaments were most likely made from porcelain with a fired gold lustre surface. Conversations with a BnF curator confirmed ceramic lustre ornaments throughout their three pagodas, supporting what was found in the V&A conservation files for their pagoda C.80-1954.
This confirmed to us that the crude and ill-fitting brass and polychrome ceramic ornaments that came with our pagodas were all later replacements. Unfortunately, putting these ornaments aside from our set left us with only three ornaments.

When these items were looked at closely, and some solvent tests were carried out, it became clear that a rough and nasty gilded surface was in fact concealing a very good condition, original ceramic gold lustre surface beneath it.

Although it was wonderful to find this lovely surface on these ornaments, it did present us with the considerable task of recreate the missing 301 ornaments.
Our three ornaments didn’t even offer us much scope for moulding and casting replicas as the size of the ornaments gets smaller as they go up the pagoda. Therefore casting from moulds of the ornament we have would not be suitable. Fortunately, having similar forms of varied scale doesn’t pose such a problem when it comes to the pairing of two fairly modern techniques; that of photogrammetry or ‘3D scanning’ and 3D printing. Having no expertise in these areas, I contacted a local creative craftsman/fabricator/engineer Mike Penwolf of Panotechnia. After some testing, Mike undertook the photogrammetry and virtual 3D model preparation of the missing ornaments.
3D photogrammetry
The virtual 3D models were achieved by systematically taking many photographs of each object to capture each surface, from many angles. Dedicated photogrammetry software (Agisoft Metashape) is then used to process the images and build up the virtual 3D object.
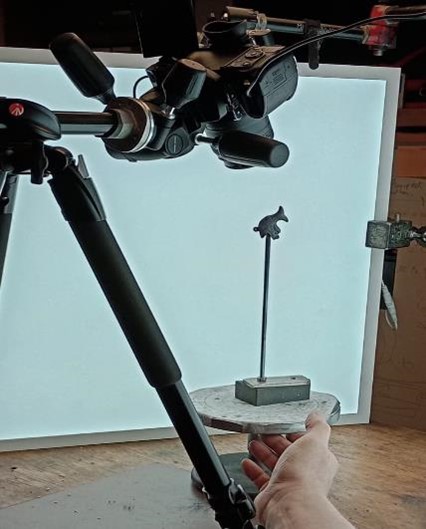
Partially reflective surfaces, such as the gilded surfaces of the ornament, reduces the accuracy of the data. So after successful removal tests, we first sprayed the ornament with a low bound grey chalk paint, designed for temporary marking. This was then flecked with fine black spots using a brush of black paint of the same type. This finely speckled matt surface is ideal for the software to discern the form of the object as it cross references the positions of the fine spots between each of the photographs. The low reflectance reduces interference from other light sources and the accuracy of the data.
The ornament was mounted on a bamboo skewer and rotated on a turntable with a photo taken at approximately every 12 degrees. This was repeated at two more camera heights so that every plane of each object was thoroughly captured. Afterwards the paint was easily removed with water and a long-haired hog bristle brush.
Once Mike had processed the images and formed a virtual 3D mesh, he skilfully refined the mesh, preparing it for 3D printing using a program called Maxon ZBrush core. This program was used to build and smooth/texture the walls of the hollow models. It also enabled him to refine the design as required to enable post-print fitting work, and to position the mesh in an orientation that best lent itself to the most accurate rendering of the visible faces.

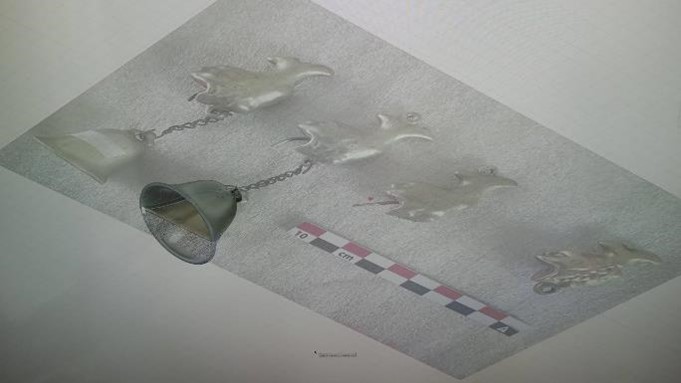
With no physical reference of a bell, Mike used images kindly shared by the BnF pagoda bells alongside photos of the V&A pagoda ornaments to construct replica bells. The software makes scaling the initial model very easy, but after scaling Mike needed to carefully edited the surfaces so that the proportions and resolution of the models matched the variations evident on the BnF and V&A pagodas ornaments.
Once he’d finished his work, Mike passed the files on to Aiva Vaisnoras to prepare and produce the actual reproductions. Aiva used the Chitubox application to edit the prints slightly, orient them for printing and provide supports so that the models retained their shape during the LCD resin printing.
Aiva’s printer has an LCD screen that sits at the bottom of a resin bath. The resin is cured by UV which is displayed precisely on the LCD screen to the shape of cross section layers of the 3D computer model. The printer builds up very thin successive layers of resin on the printing bed which slowly rises away from the LCD screen, with each layer being hardened of top of the previous. The tiny layer increments means that LCD printing can achieve very smooth and well-defined surfaces.

The printing process holds many pitfalls due to variations in scale and design of a model as well as the temperature and relative humidity of the environment which affects the resin viscosity and cure time. It is quite an art to consider all these factors and suitably adjust the support design, orientation and multitude of printer settings to achieve successful prints.
After printing, the models go through repeated bath rinses in denatured ethanol. Then after submersion in a warm water bath, the supports are removed. At this stage, the resin is still fairly soft so after thorough drying, they go through final curing in a UV booth.
After this stage, the prints have support residues and any imperfections abraded before a thin coat of acrylic aerosol primer, ready for decorating.
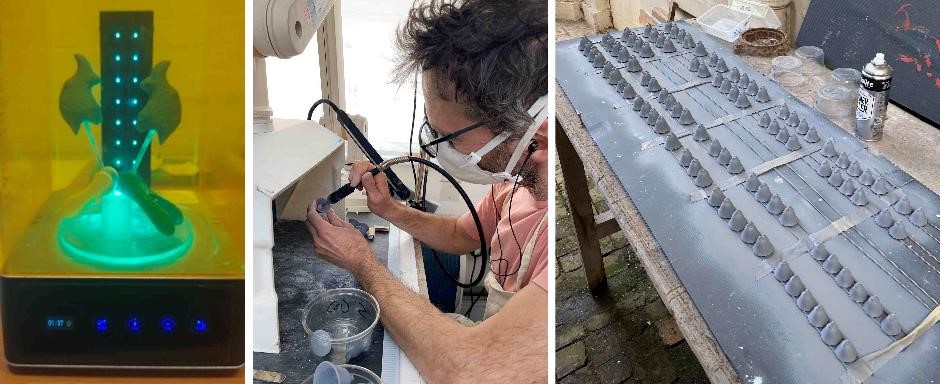
Decoration of the prints was started, using a process of oil gilding with Kolner™ 24h oil size that was used for the main pagoda tiers fine gilded line restoration, only with less oil paint added and with the size thinned slightly (2pt size, 1 pt white spirit).
This was to allow a thinner coating to be maintained and to reduce any pooling in recesses, which tended to lead to uneven curing and failures when it came to gold leaf sticking in the recesses. Lemon gold leaf was used as regular gold colour was too warm. Once gilded, the bright gold was toned and matted down to imitate the semi-matt tarnished/patinated gold alloy of the original gold lustre. This was started on the lions using Golden™ mica/regular pigmented acrylic paints/mediums and Lascaux Transparentlack acrylic varnish.

At this point we were three months away from install and on schedule. The gilded fish and lions were all gilded and toning had been started on the lions. The bells were prepared and ready for gilding.
Then, just as we started to relax into the last of the tasks, we were faced with a sudden race against time! Read the next instalment Pagodas Project Part Seven: A fortunate discovery… of unfortunate timing, to find out what happened…
