Pagodas Project Part Eight: The pagodas have landed
Whilst we were in the race to get the found ornaments ready as told in Pagodas Project Part Seven: A fortunate discovery… of unfortunate timing, we needed to get the plinths ready. Our pagodas have simple, hexagonal plinths set on a wider board that provides a secure footing, all painted a neutral grey colour. They were made for the pagodas by the museum since their acquisition in 1950.

All the other similar pagoda examples found have either no plinth, or what is or appears to be a base of European construction, so we have no original Chinese supplied precedent to match to. The plinth we have is structurally stable and of good proportions with the pagoda, so we decided to stick with it. We weren’t sure how the grey colour would look so we took one of the plinths to the Music Room where it was to be displayed, along with the bottom tier of one pagoda.
Plinth Redecoration
We wanted the bases to not detract from the pagodas so chose to use the use the blue of the carpet as a basic hue to work from. To delineate the plinth from the floor, we painted the base a slightly darker blue and the hexagonal plinth was given a subtle marbling effect in paint. The Idea of this was to break up the large flat area of the plinth so it sat better amongst the busy decoration of the Music Room and pagodas, but also gave a subtle nod to the stepped scagliola bases made by Westmacott for the original Music Room pagodas around 1817.
Assistant Conservator Russell Webb carried out the redecoration of the plinth. After painting the plinth with the background blue colour, he applied acrylic paint modified with Polyvine acrylic mediums, varying his technique to achieve a flowing and irregular marble pattern. Russell initially applied paint to Melinex™ sheet which was then transferred to the plinth surface and slid/twisted to create an initial ‘marble grain’ pattern, on which he used a variety of brushes and implements to apply, remove and soften paint on the surface. The effect is a subtle, organic pattern that we were delighted with.

Post-treatment photography and documentation
Once the ornament conservation work was complete they could be applied to the pagoda tiers and photographed. It is important to document conservation treatments so that future owners, curators and conservators are fully informed of the object condition, what is original material, what is restored and using what materials. This information goes in a report that is completed at the end of the project. This report has the initial ‘before-treatment’ photographs and condition maps as described in the Introducing the Pagodas Project, and also photographs of the pagodas ‘after-treatment’. We were now finally ready for the install.
Installation
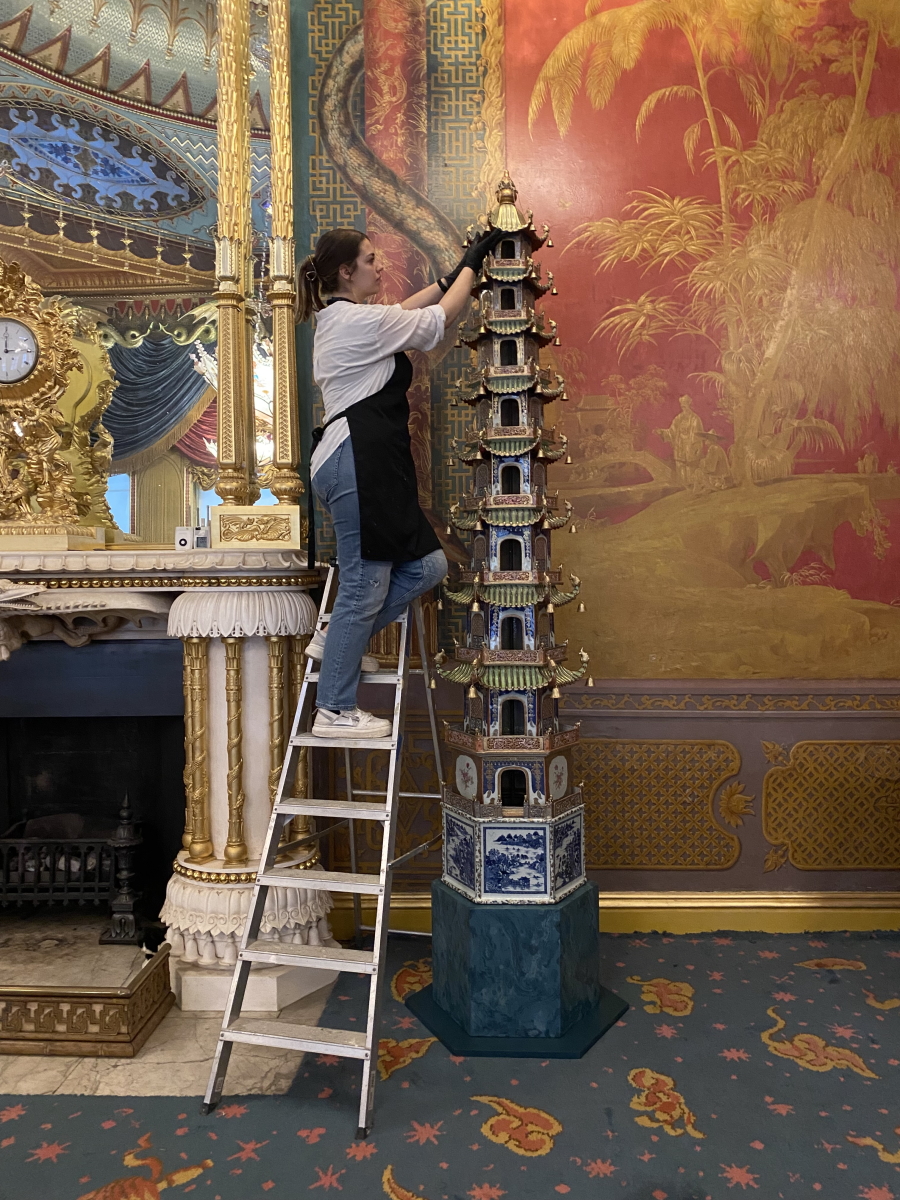
After a test build carried out in the workshop to confirm the build process, the pagoda parts were ferried to the Music Room on a trolley where they were laid out.
First of all the plinths were carefully positioned equidistant from the wall and fireplace.

A sheet of Melinex was laid on the plinth as a barrier between the plinth paint surface and the base of the bottom tier of the pagodas. Then the build began. The pagodas sections are stabilised by a threaded rod that run down the centre of each tower. In the final stages threaded nuts are tightened so that the top and bottom tiers are braced together by the rod. The lower tiers are very heavy and so it is best to avoid lifting these sections over the rod, so the first four tiers were placed on top of each other, before the rod was lowered into position.

One of the pagodas had previously suffered damage to its bottom tier, most likely because the rod had been unsupported during a build or deinstall. The damage was repaired during the treatment but care was taken to support the rod once installed into the bottom tier. A Plazterzote block was used to support the rod in position and left in place to aid future deinstallation.
As each tier was positioned, care was taken to position each with the ‘front face’ forward. This had been decided in the workshop to ensure the best condition sides would be facing the visitors. A spirit level was used to check each tier before the subsequent tier was applied. This ensured that the pagodas were built plumb and without a lean. If a tier did not sit level, it was supported with card inserts.

As each tier was positioned, the tier below was dressed with its ornaments. The final roof tier and finial had to be lifted into position together and with the ornaments already applied. This was simply because the sections were linked by chains that joined the roof ornaments with the gold and blue ceramic creatures on the finial.

The Marketing Team had commissioned a photographer to document the build for use by press and news outlets, so once the first pagodas was built, we paused to stage some build photos. Once the photographer had what he needed, we continued the install of the second pagoda.

This all happened while we were open to the public. We’d been apprehensive of undertaking the build whilst open, but visitors were generally considerate of the concentration we required, and were interested in watching the install process.

Thanks
The project wouldn’t have been possible without funding, for which the majority came from the generous patrons of Brighton & Hove Museums.
There were also significant contributions to the project by Mike Penwolf of Panotechnia and Aiva Vaisnoras who produced the 3D resin prints of the missing ornaments.
We also had excellent contributions over the four years by Conservation MA student placement volunteers Vivien Leung, Lucie le Gall, Samantha Levick and Katie Chow.
Last (but by no means least), the project team: Ana Vilela, Bernada Duric and Hannah Mortell. Whose dedication to the project and whose porcelain restoration skills that they’ve developed have exceeded all expectations:

